
 Although many people think concrete is maintenance-free, it needs to be cleaned and sealed occasionally. The elements breaking down concrete include freeze-thaw cycles, acidic or alkaline substances, and salt. In addition, concrete can be weakened by harsh chemicals such as bleach. Here are some simple tips for maintaining concrete according to professional Concrete Contractors Dallas TX.
Cleaning
When you clean and maintain concrete surfaces, you will improve their appearance and extend their life. Depending on the concrete, you may want to consider sealing it, which helps prevent stains and maintain the visual appeal. Using the right products and tools can help maintain your concrete’s beauty. To protect it from damage, use a high-quality sealer. Read on for more information. We’ll look closely at some of the important factors to consider.
First, remove any loose dirt. If you have weeds growing in cracks, pull them up. Efflorescence is a white powdery substance that can damage concrete. While at it, you can also treat any stains with liquid laundry detergent. Apply the mixture to the stain and let it sit for a half-hour before rinsing. If the stain is really stubborn, you can try a mixture of water and chlorine bleach.
When cleaning concrete, it’s important to apply the cleaning solution heavily to the surface. While the concrete may not appear damp after a few minutes, the cleaner will penetrate the concrete’s naturally occurring nooks and crannies. However, if the concrete is a little neglected or has grown on it, more frequent cleanings may be required. This is why it’s crucial to clean concrete surfaces properly.
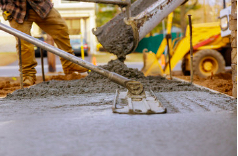
Sealing
Proper sealing of concrete will ensure the durability of your exterior surface for decades to come. The benefits of sealing your concrete are numerous, including protection against extreme temperatures and inclement weather, as well as heavy impacts and abrasion. Sealants for interior concrete surfaces also help prevent damage from heavy foot traffic, staining, and other materials that can damage the surface. For best results, wait for one month after installing new concrete before applying a sealant.
One of the best reasons for sealing your concrete is to extend its life. Exterior concrete is prone to chipping, discoloration, and cracking. Sealing your concrete will protect your driveway from spills, stains, and dirt. Concrete driveways can last up to 30 years, although they may need replacement sooner if they show signs of wear. To protect your concrete surface, apply a sealant to it every three to five years. By sealing your driveway, you can prolong its life for many years.
When sealing your concrete, always remember that it is important to select the right sealer for your application and the type of concrete you have on your property. While you can do this job yourself, hiring a professional to help you apply the sealer is advisable. A professional will ensure that the sealer is applied correctly and is safe for your concrete. Using a professional will ensure that you get the right type of concrete sealer for your project.
Resurfacing
Resurfacing is a process in concrete maintenance whereby an old, cracked surface is resurfaced using a new material. The resurfacing process begins by cleaning the existing surface of loose debris and oil and grease stains. If necessary, power washing is necessary to remove these materials. Make sure to avoid soap or any other extraneous material since it can affect the adhesion of the new resurfacing material. The concrete resurfacing mix should be applied to the concrete surface using a squeegee or broom. It is important to do this to create a smooth canvas for the resurfacing material.
Before resurfacing, a professional masonry company should inspect the concrete. The concrete must be dry and above freezing temperatures during the resurfacing process. Extreme heat may cause the new resurfacing compound to dry out too quickly and crack. Extreme temperatures can also cause the compound to degrade or crack. If you suspect a cracked or chipped concrete surface, you should get it inspected by a professional.
The underlying layer of the concrete surface must be sufficiently thick to support the new resurfacing material. It may also contain longitudinal or transverse joints. In this case, the joint must transfer the load smoothly to the underlying layer without impairing the smoothness of the new surface. Cracks and joints must be free of fine solids and moisture. Reinforcement should be covered with a suitable cover to avoid deterioration.
Cleaning with rain water
In case you have a rain barrel on your property, you might consider cleaning concrete with rainwater. This type of water is great for many purposes, from flushing toilets to watering plants. A custom-designed system will allow you to utilize rainwater for these purposes. But before you start cleaning with rainwater, consider what your goals are. You should know that a well-balanced mix is key to creating a strong, durable finish.
Cleaning up spills
A common mistake that can lead to a disaster is not cleaning up spills quickly and thoroughly. Oil, gas, and other spills can have damaging effects on concrete. Because concrete is not the most absorbent material, oil stains will spread and eventually damage the concrete surface. The typical solution to cleaning up oil stains is to dilute them with water, but this will not remove the spill completely and will make it worse.
If the spill spreads, clean it up as soon as possible. Use absorbent materials to soak up spilled materials. Also, remember to apply caution tape to prevent any contact with the spill. You can wipe it up with water and place a rag if it is a small spill. Alternatively, you can use a spill sock. However, be sure to wash off the spill immediately with plenty of water.
In case of a spill involving oil or other liquids, use to remove it. If the spill is from oil, you can also apply SimpleGreen or SpillFix, which will break down oil and remove stains. Lastly, a good cleaning product is Concrete Remover. This is a non-toxic product that can be sprayed on spilled liquids.
Protecting concrete from staining
There are several stains, and you must consider them all carefully before choosing the best one for your concrete project. Acid stains are reactive and penetrate deep into the concrete’s surface. They are limited to about eight colors but can be blended, streaked or tweaked to achieve a wide range of colors. Acid stains require a topcoat to protect them from fading and to maintain their color and consistency. Acid stains can be used indoors and outdoors and best used on new concrete.
There are two basic types of products available for protecting concrete from staining. One type of product prevents staining while the other prevents it. A coating prevents stains from forming while a sealer helps prevent staining by limiting the penetration of liquids into the surface. Regardless of your type of sealer, a good sealer can protect concrete from staining and prolong its lifespan.
Concrete patio sealers are available to protect concrete from environmental stains. The sealer will prevent spills from reaching the concrete’s surface, but you may have to scrub the floor a few times to remove the sealer. Concrete sealers are best suited for patios made from stamped or broom-finished concrete since they have less risk of staining. It would be best to choose a film-forming sealer with a UV-stable resin.
Cleaning with chemicals
The chemical cleaners available in the market can effectively clean different kinds of concrete. They work by creating chemical reactions, which help remove toxins and grease from concrete. When used properly, these cleaners can improve the look of concrete and enhance its durability. However, you should choose the right concrete cleaner based on the type of concrete and the type of cleaning you will do. To help you choose the right cleaner, here are some tips for cleaning concrete with chemicals.
Enzyme cleaners can be used to remove staining from concrete. These chemicals don’t need water and require no scrubbing, although they may need to be reapplied for larger stained areas. Moreover, some chemical cleaners available in the market are effective in getting rid of oil stains. Muriatic acid, for example, works best for this purpose since it breaks down oil stains.
If you want to use a chemical cleaner, you should choose one that can remove dirt and mold. Use a wire scrub brush to apply the cleaning solution and scrub the surface in a circular motion. Afterward, rinse the area with a hose. This type of cleaning solution is effective for removing mildew and mold from concrete. However, do not use muriatic acid in basements because it is toxic for children and pets.
